Thursday, November 29, 2012

Replacing the dimmer switch in your Volvo 850 / S70

Volvo 850's / S70's that were made in 1995 up to 1998 are starting to show their age, with several parts that need to be replaced, due to age. One of the parts that is notorious to fail due to age is the dimmer switch located on your dashboard, to the left of the instrument panel. A symptom of a failing switch is most noticeable when driving at night. The instrument cluster may be very dim, then the brightness may adjust its self with out you even touching the dimmer. This is a very simple job to do, and can be done in less than 5 minutes.

Prerequisites:
Flat head screw driver
A towel or something soft
A marker or something to pry against
New dimmer switch

1. Locate the dimmer switch. It is right next to the instrument panel, next to the fuel gauge. Its also above the rear foglight switch, if equipped.

2. Take your towel and screw driver, and pry the foglight switch out, starting at the bottom. On cars not equipped with foglights, there is a "dummy" plastic cover here. All you have to do is pry it out. One you have part of the switch or cover out, you can remove it with your fingers.


3. You can just let the foglight switch hang loosely (if equipped).


4. Onto the dimmer switch. using your marker or appropriate prying tool, put your flat head screw driver in the back lip of the dimmer switch. Pry it out towards you.


5. Once the switch is out, use your flat head screw driver to pry the two clips holding the dimmer switch in place with the electrical connector.


6. Get your new dimmer switch and snap it into the electrical connector.

7. Push the dimmer back into its appropriate location.

8. Push the foglight switch back into place, or snap the dummy cover back into its location. Your finished!

Replacing or installing a cabin air filter on your Volvo 850 / S70

Most Volvo's from the mid 1990's up until present have something called a cabin air filter installed somewhere near the front of the passenger air bag. This filter acts as an air filter, and filtrates the air that comes into the cabin of the car whenever the A/C or heat is on. Over time, this filter can clog up with debris such as leaves, dirt, dust, etc. This tutorial will show you how to change your filter, and will also show you how to install one if your car doesn't currently have one.

Prerequisites:

T25 torx head driver
New cabin air filter
(optional) cabin air filter mount

1. Open the engine bay by pulling the red lever on the left side of the drivers side kick panel.

2. Locate the air breather hose on your car (if equipped) and disconnect it as shown in the picture below.


 3. Use your T25 Torx head driver and remove the two screws holding the plastic flap down, circled in yellow in the picture below.


4. Pull the flap foward and lift up. Then remove the cabin air filter. (If equipped)


As you can see on this 850, the cabin air filter was almost completely disintegrated. 

 (Optional Step) If your car doesn't have a cabin air filter mount installed, one can be purchased at your local Volvo dealer for about $25. All you have to do is slip on the mount onto the existing rectangular tube.

5. Place your new filter in the mount. If you have a genuine Volvo air filter, place the filter with the tab facing towards the front of the car. This tab snaps in and insures a tight fit. Several aftermarket filters, are cheaper and don't have this tab, which doesn't really matter, it just makes the filter more secure.

 6. Make sure the filter is set into place and isn't binding on anything.


7. Lower the plastic flap on top of the air filter. Make sure that you slip the flap underneath the weatherstripping, or else you will get leaks in your air filter, which can lead to mold and musty scents in your A/C / heating system.

8. Tighten the two T25 bolts so that the plastic strip is snug. Your finished!

Tuesday, November 13, 2012

Changing the front oxygen sensor on a 1995-97 850

Oxygen sensors (also known as 02 sensors for short) are sensors placed inside the exhaust system of most cars made after 1985. Volvo also employed these sensors. The purpose of 02 sensors is to determine the ratio of oxygen to carbon monoxide from the vechicles emissions. reading the amount of oxygen makes the 02 sensor send information to the engine to make it inject more fuel (creating a "rich" combustion) or to make it inject less fuel (creating "a lean" combustion). A rich situation makes the engine burn more fuel than nessecary, reducing fuel economy. A lean situation burns too little fuel, increasing risk of engine damage and reducing power output. For most Volvo 850's, many 02 sensors are the original sensors from 15 to 18 years ago. If you feel the engine running strange or a "surging" sensation during acceleration, have a check engine light, or if by reading your engine codes with an OBDII code scanner you read a lean or rich condition, you may need to replace your O2 sensor.

Tools needed:

ramps or jack stands
needle nose pliers
3/8" socket wrench
10mm socket
12mm socket
21mm box end wrench
WD40 or equivilent penetrating oil.

(1.) Optional first step: Since 02 sensors are close to the asphalt and are subjected to rough, moist conditions, you may want to soak the 02 sensor in WD40 to loosen the rust. A rusty 02 sensors can increase the risk of rounding off the 02 sensor bolt, which makes extraction more difficult.

(2.) Drive the front of the car up unto ramps or use a jack and jack stands to prop up the front of the car.

(3.) Go underneath the car and unplug the O2 sensor, as shown below. It is located about 4' away from the front of the car.


In this picture, you can see that it is located near the exhaust manifold. You may need to remove the cross brace. I managed to remove my oxygen sensor without taking out the brace.

(4.) Use a pair of pliers and pull out the clip that holds the 02 sensor wire in place. It is plastic, and due to age and heat, may be brittle. Carefully remove it, or just buy a replacement clip.
(5.) Here is the 02 sensor. Use a 21mm box end wrench or a specialty 02 sensor flared wrench to remove it. If you have coated it in penetrating oil as stated before, it should come out easily. If not, be careful to not round off the edges of the hex head, or you may have to drill it out.
(6.)Here is the new O2 sensor installed. Installation is the reverse of removal.

(7.) Once the new 02 sensor is installed, use your scan tool to read the engine codes. If any codes are found, erase them. Now your done!

Tuesday, October 23, 2012

How to install an antenna down switch in your 850

Volvo decided in the mid 90's that the 960 was their permier luxury vehicle. The 960 included an "antenna down switch". The point of the switch was to keep the extendable antenna in the down position when the radio wasn't being used. Whenever the driver was listening to a casette tape or a CD, they would flip the switch and the antenna wouldn't extend. On the 850, there was no such switch. So, I am going to show you a  rather simple upgrade for your 850's radio unit.

Tool / equipment required:

2 pieces of 16 gauge wire cut at 18 inches

(4) 16 gauge cable crimps

a pair of pliers

some super glue

VERY IMPORTANT: your radio code. If you unplug the battery of the car or disconnect the headunit power plug, the radio anti-theft prevents the radio from working unless the radios' 4 digit code is plugged in. Not doing can render your radio useless!

A switch (Note: you dont need a specific antenna down switch. you can use any switch that is normally open. I repurposed an 850 foglight switch, since i couldnt find an antenna down switch.)


1: Remove the radio from the dashboard. This is done by using a flat head screw driver and pushing in the two tabs on either side of the radio. After they pop out, pull the radio foward.


2. Depending on your head unit, you will have to unplug several connections. I have a 6 cd changer in the trunk, and a premium headunit. I had to unplug the antenna, the CD cord, the 2 power / data cables, and the main power cord.Remove your headunit completely.

3. Take a flat head screw driver, and pry out a cover from underneath the instrument cluster.


4. Take both pieces of wire, and feed them though the new switch hole to the back of the radio opening.
5. Find the red wire in pin #3. This is your antenna signal wire. This is the wire you want to cut, about 4" from the connector.
 
6. Take your wires, and put a crimp on them. Make it tight and snug so it doesn't vibrate loose. Connect a wire to the connector side, and one to the wire harness side.
 7. You can reattach and reinstall your radio. Just push it back in the dashoard, and push the two tabs in to lock it into place.


8. The final step is to connect the wires to the switch. take a wire crimp and crimp half of it on the wire. Then crimp one wire to pin #2, and one to pin #5. Refer to the picture below. Add a dab of super glue to keep the  crimps in place.

9. Once the wires are connected, push the switch into the empty slot in the dash, and your done! Punch in your radio code if prompted, and try it out!


Tuesday, September 25, 2012

Changing the rear door speakers on a 2005 Volvo XC70

Last weekend I chose to change the rear speakers on my XC70. The speakers still worked fine, they just weren't crisp enough (at least in my opinion). So, I went on Amazon and bought a pair of 6.5" Pioneer speakers. What a difference they make.

Materials required:

6.5" Speakers (any brand is fine)
A torx bit set with bits ranging from 10 to 30
A small flat head screw driver
A set of pliers
A corded or cordless drill with a 1/8" bit for steel

1. The door panel must first be removed. As you can see, there are plastic riviets surrounding the edge of the interior door panel. Use a flat head screw driver to pry them out. You can click on any of the following photos to enlarge them.


2. Locate this cover in the interior side of the panel. Its right inside the door handle pocket. use your small screw driver to pry it out. Then use a T25 bit to uncrew the final bolt.

3. Grab the door handle pocket, and lift the interior panel up. The panel has a lip on the inside that slides next to the glass. Make sure to not move it too high, because we must now disconnect it.
4. take your screw driver and pry the plastic cover that holds the door release cable. Be careful to not break it!
 5. This is the switch that makes the glass go up or down. take your screw driver and pry the clips open. Once free, wiggle the switch out.
Here is the switch, freed from the panel:
 6. Next, take your drill and drill out the rivets that hold the speaker in place. Once drilled, just tug hard and the speaker should give way. There is a connector, disconnect it to remove the stock speaker and its housing.
 Here is the new Pioneer speaker vs. the stock Volvo speaker. Notice how the pioneer has a rubber filter vs.  the Volvo's paper one. Rubber filters make a clearer sound.
7. Take your pliers and pull the connector free from the old speakers wires. You will need this.
 8. Connect the wires to your new speaker. Remember black goes to ground, and red / white goes to the positive terminal.
 9. You can simply crimp the wires together like I did, or you can solder them together for better sound quality. I took the panel off again to solder them, just to make it a better connection.

 10. Put your new speaker in the old speaker hole. Mark the holes where the screws go in. Take your drill and drill in the new holes.
 11. Take your screws and fasten the new speaker in.
 12. Now its time to reconnect the door panels electrical and door release connections.
 13. Now snap in the door cable back in place.
14. Now all you have to do its refasten the door panel to the metal exterior panel. Once your done, test it out. If you hear noise from the speaker, your done! If you dont, switch the wires, your polarities are wrong.


Tuesday, September 18, 2012

Changing the coolant on a Volvo 850 / T5-R

This weekend I took the liberty of changing the coolant in the T5-R. The process is the same for all 1993 to 1997 Volvo 850's / Volvo T5-R's. First you will need several materials:

Car wheel ramps or Jack Stands (I prefer wheel ramps)
A 10mm open ended wrench
A 13mm open ended wrench
4 liters of deionized water
8 liters of 50/50 premixed coolant (I recomend Prestone 50/50

optional: Drainpan and new radiator drain plug

Prerequisites: A level driveway or work area, cold engine

Step 1: drive the car up onto the ramps, or if you have jackstands, jack up the car and place a jackstand beneath the driver and passenger side subframe.


Step 2: Open your hood by releasing the latch near the driver side kick panel, then release the latch on the hood.

Step 3: Open the coolant cap. It is located inside the engine bay on the left.


Step 4: Go underneath the front of the car and remove the splash guard. It is held on by two 10mm bolts.

Step 5: After the splash guard is removed, locate the radiator drain plug. Looking at the front of the car, it is on the left side on the bottom of the radiator.

 Step 6: Take your 13mm wrench and loosen the drain plug. Be careful to not use too much pressure. It is made of plastic, and may break easily if forced too much.

Step 7: Unscrew it by hand.
Once unscrewed, allow the coolant to drain. I chose to drain into a drain pan, but it not nessecary. Approximately 6 liters of coolant will come out.
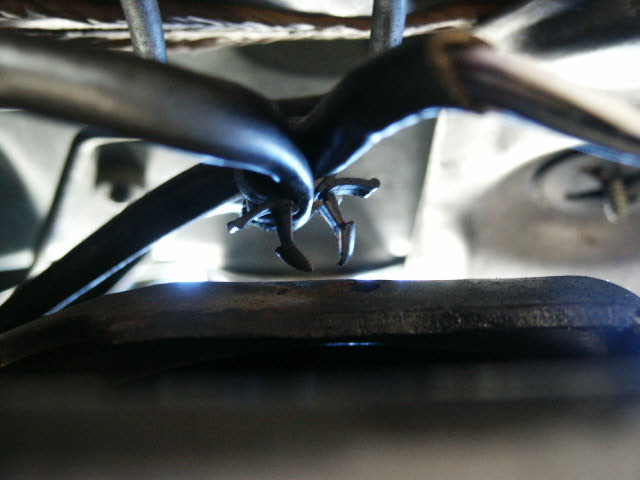
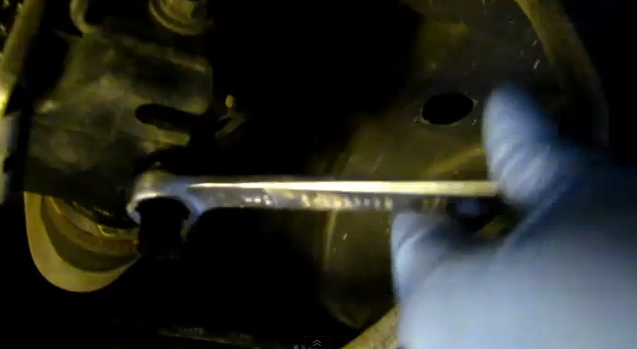
Step 8: Locate the engine drain plug. It is located right above the passenger side halfshaft. Loosen it with your 13mm wrench. You can choose to use a hose so that is will flow cleaner, but with my driveway and slight incline, I managed to catch 90% of it. About 1 liter will drain out.
Step 9: Retighten your engine drain plug and radiator drain plug.

Step 10: Add 4 liters of deionized water to your coolant resevoir. Refer to step 3 for resevoir location.

Step 11: After the water has been added, start your Volvo. Allow the engine to run for 2 minutes. In this step, the water pump is circulating the water through the cooling system, taking any old coolant along with it. After 2 to 3 minutes, shut the engine off.

Step 12: Open up your radiator drain plug again. You will notice the fluid is clearer than before, meaning the water has flushed the old coolant out. Four to 4 1/2 liters will come out.

Step 13: Close the drain plug. Its now time to add the new coolant.

Step 14: Reinstall the splash guard. We are finished draining fluids.

Step 15: Take your coolant and slowly add it to the coolant resevoir. You will notice the tank will fill up, then slowly go down. Keep adding coolant till the level normalizes. The ammount of coolant that the engine will take is anywhere from 7 liters for the non-turbo Volvo 850's, to 7.4 liters for Turbo models / T5-R.


Step 16: Now it is time to burp the system. Air pockets may have formed while refilling the system. Leave the coolant cap off and hood open.

Step 17: Start your car.

Step 18: Let the engine run till the temperature gauge (the temperature gauge is to the right of the fuel guage, as shown in the picture below) hits the middle area of the gauge. Once it does, allow the engine to run for another 2 minutes. The engine is approximately 210° fahrenheit.


Step 19: The coolant level will drop. Add enough coolant so that the level is near the "MAX" marking on the resevoir. Congratulations, your done.